Crawl Space Dehumidifier Guide: Getting the Setup Right
Quick Answer
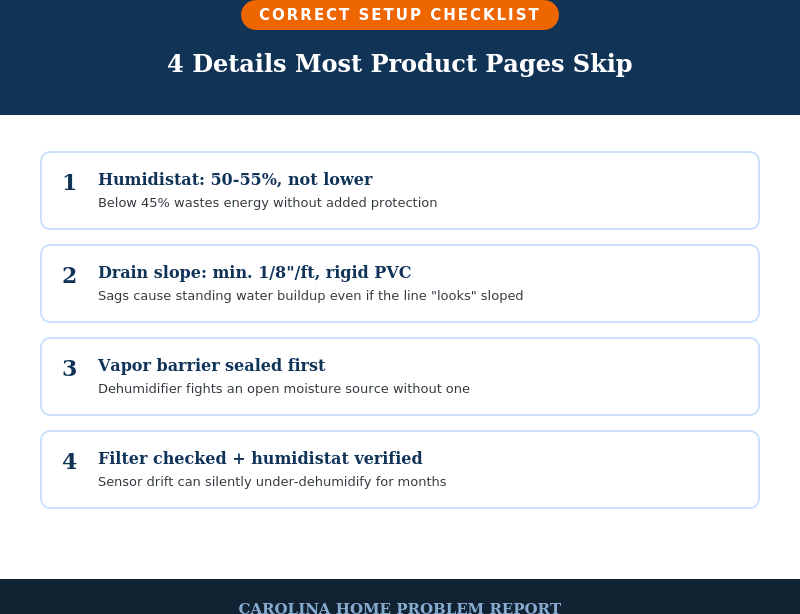
This crawl space dehumidifier guide covers what most product pages skip: the setup details that determine whether a correctly sized unit actually performs. Set the humidistat to 50-55% (not lower — below 45% wastes energy for no added protection), install the condensate drain with a continuous 1/8-inch-per-foot downward slope in rigid PVC or rated hose, confirm a code-compliant vapor barrier is already sealed underneath the unit, and put the dehumidifier on a dedicated, GFCI-protected circuit. Skip any one of these and a well-reviewed unit can still underperform, trip breakers, or fail early.
Key Takeaways
- Target humidistat setpoint is 50-55% relative humidity — below 45% is diminishing returns, not extra protection.
- Gravity drainage with a continuous 1/8 in./ft. minimum slope is the most reliable condensate line setup; a single low sag can back up the whole line.
- The 2018 NC Residential Code (R409.2.1-adjacent ground vapor retarder rules) requires a minimum 6-inch overlap at seams — 12 inches is the recommended practice — and the sheeting should lap up the walls to within about 4 inches of the top of the foundation.
- Placement affects performance as much as sizing — a unit tucked in a corner with no return path can short-circuit its own airflow and leave far corners of the crawl space undried.
- NEC 210.8 requires GFCI protection for receptacles (and lighting outlets) in crawl spaces — a standard household outlet without GFCI protection is a code violation, not just a minor oversight.
- A unit that runs constantly without the humidity dropping is almost never a bad dehumidifier — it's usually an open moisture source, a missing or failed vapor barrier, or a drain line backing up and triggering a safety shutoff.
Table of Contents
- The Crawl Space Dehumidifier Guide Basics: Target Humidity Setting
- Condensate Drainage: Where Installations Actually Fail
- Vapor Barrier Requirements This Crawl Space Dehumidifier Guide Covers (And Most Don't)
- Airflow and Placement: Getting Distribution Right
- Electrical Requirements Most Installers Skip Mentioning
- Filter and Coil Maintenance
- Troubleshooting: When the Unit Is Running But Nothing's Changing
- How This Crawl Space Dehumidifier Guide Fits With Choosing a Unit
- Frequently Asked Questions
| Setup Detail | Correct Spec |
|---|---|
| Humidistat setpoint | 50-55% RH (not below 45%) |
| Drain line slope | Continuous minimum 1/8 in. per foot, no sags |
| Vapor barrier seam overlap | 6 in. minimum (code), 12 in. recommended |
| Vapor barrier wall lap | Up foundation wall to within ~4 in. of the top |
| Electrical | Dedicated circuit, GFCI-protected (NEC 210.8) |
The Crawl Space Dehumidifier Guide Basics: Target Humidity Setting
Most crawl space dehumidifier content online focuses on one question: which unit should you buy. That's a real and useful question, but it skips over something that matters just as much — a correctly chosen dehumidifier set up wrong underperforms, wastes energy, or fails early.
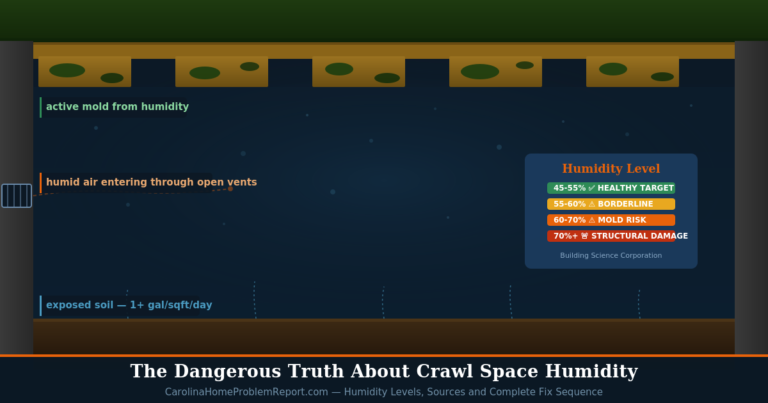
Building-science guidance on crawlspace dehumidification is specific here: "the target relative humidity setpoint for a crawlspace dehumidifier is 50% to 55%." That range isn't arbitrary — it's chosen to stay well below the 60% relative humidity threshold where mold germination becomes possible, while not wasting energy chasing an unnecessarily low number.
This second half is the part homeowners commonly get wrong in the other direction: setting the humidistat aggressively low, assuming drier is always better. It isn't — "setting the humidistat cycling threshold below 45% wastes energy without providing meaningful additional protection." Once you're solidly under 55%, additional dehumidification below that is diminishing returns, not extra insurance.
Condensate Drainage: Where Installations Actually Fail
A dehumidifier that isn't draining correctly either backs up and shuts off, or drains slowly enough to encourage standing water exactly where you don't want it — under a house. Building-science guidance is clear about the preferred method: "gravity drainage is the simplest and most reliable condensate drain line configuration." A condensate pump is sometimes necessary when gravity drainage isn't geometrically possible, but it's a second point of mechanical failure a gravity line doesn't have.
The specific detail almost no product page mentions is slope: the drain line "requires a continuous downward slope — typically a minimum of 1/8 inch per foot of run — to prevent water from pooling in low spots." A line that looks like it's sloping downward by eye but has even one low sag partway along will collect standing water at that sag, which can eventually back up the whole line.
On material, the guidance is equally specific: "the line should be rigid PVC or a high-quality flexible hose rated for continuous water contact — not a garden hose or improvised tubing." A standard garden hose isn't rated for the constant water exposure a condensate line experiences and will degrade faster than the dehumidifier it's draining.
Before calling an installation finished, test the drain under real operating conditions rather than a visual check alone — run the unit, confirm water is actually moving the full length of the line, and watch the low point (if a pump is involved) to confirm it cycles rather than just sitting full. A line that looks correctly pitched can still have a hidden belly inside a joist bay that only shows up once water is actually flowing through it.
Vapor Barrier Requirements This Crawl Space Dehumidifier Guide Covers (And Most Don't)
A crawl space dehumidifier is meant to work alongside a sealed vapor barrier, not instead of one — the barrier stops ground moisture from entering the space in the first place, and the dehumidifier handles the remaining humidity in the air above it. Running a dehumidifier over exposed soil without a barrier means it's fighting a continuous moisture source instead of maintaining an already-controlled space, which shortens run-time efficiency and increases wear.
Most buying guides stop at "install a vapor barrier" without saying what a correctly installed one actually requires. The specifics most product pages skip: a 6-mil polyethylene ground vapor retarder is the baseline material, and the North Carolina Residential Code (adopted statewide from the IRC) sets a minimum 6-inch overlap at seams, with 12 inches recommended as better practice, sealed with adhesive and tape rather than left loose.
The sheeting also needs to run up the foundation walls, lapping to within roughly 4 inches of the top of the wall, and secured there with strapping rather than left to sag or pull away over time. A barrier that's correctly laid on the floor but not properly lapped and sealed at the walls still leaves a gap for moisture to enter around the perimeter — exactly where a dehumidifier can't compensate for it.
If you haven't confirmed your crawl space has a sealed, code-compliant vapor barrier already in place, that's a prerequisite step before dehumidifier setup, not an optional add-on afterward.
Airflow and Placement: Getting Distribution Right
Sizing a unit correctly for your square footage only works if the air it's processing actually circulates through the entire crawl space. A unit placed in a corner with no clear return path can end up "short-circuiting" — pulling in air it just dehumidified near its own intake, while the far end of the crawl space barely gets touched.
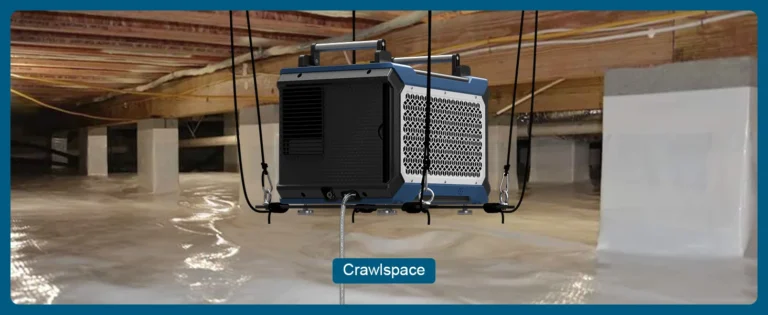
The fix is placement, not a bigger unit: position the dehumidifier roughly central to the space (or at the point where multiple sections meet), with clear space on the intake side, and avoid boxing it in against a wall or stacked storage.
In larger or sectioned crawl spaces, some installers add short duct runs to push conditioned air into the sections farthest from the unit. If you do this, stay within the manufacturer's rated fan curve or duct-length limits —
adding ductwork reduces the delivered airflow compared to the unit running open, and exceeding the manufacturer's limits can starve the far end of the ducting while overworking the unit itself. For most single-zone residential crawl spaces under a typical home footprint, correct central placement alone is enough without adding ductwork.
Electrical Requirements Most Installers Skip Mentioning
A crawl space dehumidifier is a dedicated appliance-level load, and most product listings simply say "plug it in" without flagging the code requirement that applies to the outlet itself. The National Electrical Code (NEC 210.8) requires ground-fault circuit interrupter (GFCI) protection for receptacles located in crawl spaces at or below grade level —
and the same protection requirement extends to lighting outlets installed in a crawl space, not just receptacles. A standard, non-GFCI outlet run out to a crawl space for a dehumidifier is a code violation, not just a minor oversight, and it's one of the more common gaps found during a home inspection.
Beyond code compliance, a dedicated circuit (rather than sharing a circuit with other loads) reduces nuisance tripping, since a dehumidifier's compressor draws a meaningful startup surge. If your crawl space outlet trips repeatedly when the dehumidifier cycles on, that's worth having an electrician check before assuming the unit itself is defective.
Filter and Coil Maintenance
Beyond initial setup, ongoing maintenance is the other area generic product listings gloss over. A dirty intake filter reduces airflow across the unit's refrigeration coils, which lowers moisture-removal efficiency the same way a dirty HVAC filter reduces a furnace's performance — the unit runs longer to remove the same amount of water, increasing energy cost and wear.
Checking and rinsing the intake filter on a regular schedule (check your specific unit's manual for the recommended interval) keeps the dehumidifier operating at its rated capacity rather than a degraded one.
It's also worth periodically confirming the humidistat is actually reading correctly rather than assuming a set-it-and-forget-it setup stays accurate indefinitely. A cheap standalone hygrometer placed a few feet from the unit, checked against the dehumidifier's own display every few months, catches sensor drift before it causes the unit to run more (or less) than it should.
A unit reporting 52% when the space is actually sitting closer to 60% will quietly under-dehumidify for months before anyone notices a problem, since nothing about the dehumidifier itself signals that its own reading has drifted.
Troubleshooting: When the Unit Is Running But Nothing's Changing
This is the complaint that shows up most often in homeowner forums, and it's rarely a defective dehumidifier. Work through these in order before assuming the unit itself failed:
- Running constantly, humidity isn't dropping: almost always an open moisture source the dehumidifier can't outpace — a missing or torn vapor barrier, exposed soil, or a plumbing leak. Check for a vapor barrier problem before assuming the unit is undersized.
- Shuts off unexpectedly: often a full condensate reservoir on a pump-based unit, or a safety shutoff triggered by a backed-up gravity line. Trace the drain line for the sag described above before replacing a part.
- Short-cycles (on/off repeatedly in quick succession): can be a humidistat reading error (see the hygrometer check above), a placement problem causing the sensor to read its own just-dried exhaust air, or — per manufacturer troubleshooting guidance — airflow restriction from a dirty filter or blocked coil.
- Reads a lower humidity than the room actually feels: check placement — a unit tucked against a wall or near its own exhaust can read artificially low while the rest of the space stays damp.
If you've worked through drainage, placement, and the vapor barrier and the unit still isn't holding the 50-55% target, that's the point to call in a crawl space specialist rather than keep troubleshooting a setup issue that may actually be a structural moisture source.
How This Crawl Space Dehumidifier Guide Fits With Choosing a Unit
This guide assumes you already have (or are about to buy) a crawl space dehumidifier and want to set it up correctly — for help actually choosing which unit to buy, our best crawl space dehumidifier for NC/SC guide covers specific product picks and selection criteria in depth.
If you're specifically sizing a commercial-grade unit for a Carolina crawl space, our crawl space dehumidifier sizing guide covers that in more detail.Frequently Asked Questions
What humidity percentage should a crawl space dehumidifier be set to?
50-55% relative humidity. That stays well below the 60% threshold where mold germination becomes possible, without wasting energy chasing an unnecessarily low number below 45%.
Does my crawl space dehumidifier drain line need a specific slope?
Yes — a continuous minimum downward slope of 1/8 inch per foot of run, with no low sags. A single low spot can collect standing water and eventually back up the entire line.
Does a crawl space outlet for a dehumidifier need to be GFCI-protected?
Yes. NEC 210.8 requires GFCI protection for receptacles (and lighting outlets) in crawl spaces at or below grade level. A standard outlet without GFCI protection is a code violation.
My crawl space dehumidifier runs constantly but humidity won't drop — why?
This is almost always an open moisture source outpacing the unit — most commonly a missing, torn, or poorly sealed vapor barrier, or exposed soil. Check the vapor barrier before assuming the dehumidifier is undersized or defective.
Do I need a vapor barrier if I already have a dehumidifier?
Yes. A dehumidifier is designed to manage the remaining humidity in the air, not to replace a sealed vapor barrier that stops ground moisture from entering in the first place. Running one without the other means it's fighting a continuous moisture source.
🏠 CAROLINA LOCAL SUMMARY
The Bottom Line on This Crawl Space Dehumidifier Guide:
- Set the humidistat to 50-55% — not below 45%, which wastes energy for no added benefit.
- Install the condensate drain with a continuous 1/8 in./ft. slope in rigid PVC or rated hose.
- Confirm a code-compliant, properly lapped and sealed vapor barrier is in place first.
- Put the unit on a dedicated, GFCI-protected circuit, and place it centrally to avoid short-circuiting airflow.
The dehumidifier itself is only half of a working crawl space moisture-control setup. For help choosing which unit to buy in the first place, see our best crawl space dehumidifier for NC/SC guide.
About the Author
This guide was researched using independent building-science guidance on crawlspace dehumidification setpoints, drainage, and installation practices, the North Carolina Residential Code's ground vapor retarder requirements, and NEC 210.8's GFCI protection rules for crawl space electrical outlets, cross-referenced against Carolina Home Problem Report's own crawl space dehumidifier product content, to cover the setup details most buying guides leave out.