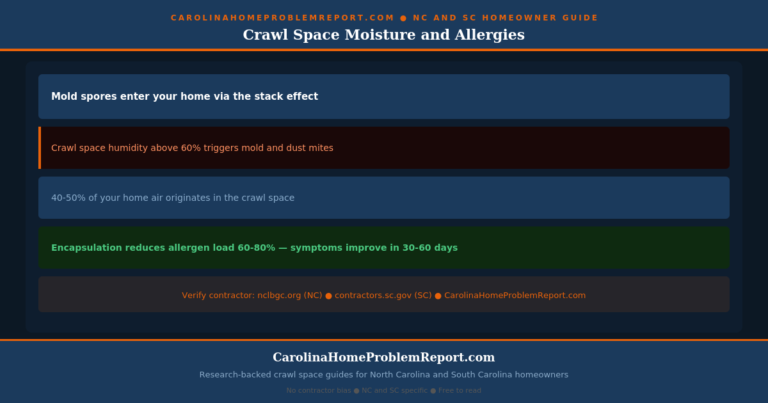
DIY Crawl Space Encapsulation [Warning: What Goes Wrong + Complete Carolina Step-by-Step Guide to Save $2,000–$5,000]
DIY crawl space encapsulation can save Carolina homeowners $2,000–$5,000 compared to professional installation — but only if you do the right components yourself and hire professionals for the rest. The honest answer is that a floor vapor barrier and vent sealing are genuine DIY tasks. Commercial dehumidifier sizing and installation, wall insulation, and any work involving fuel-burning appliances are not. Getting the line wrong in either direction — attempting what should be professional work, or hiring out what you could safely do yourself — costs real money.
⭐ Key Takeaways
- ✓DIY materials for a complete encapsulation run $1,500–$3,000 versus $5,000–$8,000 professional — real savings are available for capable homeowners
- ✓Do NOT seal foundation vents if there is a gas furnace, water heater, or other fuel-burning appliance in the crawl space — carbon monoxide risk requires professional combustion air assessment first
- ✓The most common DIY encapsulation mistake is installing a vapor barrier over active moisture problems — mold, standing water, or pest activity must be resolved before any barrier goes in
- ✓A NC building permit is required for converting a vented crawl space to a closed one — confirm before starting any vent sealing work
- ✓A hybrid approach — DIY the vapor barrier and prep work, hire professionals for dehumidifier installation and vent sealing — often delivers the best combination of savings and quality
DIY crawl space encapsulation attracts Carolina homeowners for an obvious reason — professional encapsulation costs $5,000–$8,000 for a typical home, and the materials to do the same job yourself run $1,500–$3,000. That is a real gap worth investigating. The question is not whether DIY encapsulation is possible — it clearly is — but whether it is the right choice for your specific situation, your skill level, and the specific conditions of your crawl space.
The crawl space contracting industry sees a steady stream of homeowners who attempted DIY encapsulation and created problems that cost more to fix than the original professional installation would have cost. Trapped moisture behind improperly installed wall barriers. Sealed vents in crawl spaces with gas water heaters — a carbon monoxide hazard. Wrong tape that failed within months leaving unsealed seams. These are not rare edge cases. They are the predictable outcomes of attempting professional-level work without the correct information about where the DIY line actually is.
This guide gives Carolina homeowners a completely honest assessment of DIY crawl space encapsulation — what you can do yourself and save real money, what you should leave to professionals and why, the complete step-by-step sequence for the DIY components, the material shopping list with current 2026 prices, and the specific safety issues that make certain crawl space work non-negotiable professional territory in North and South Carolina.
In This Article
- The Honest DIY Line — What You Can and Cannot Do Yourself
- Safety First — The Combustion Air Warning and Other Non-Negotiables
- Before You Start — Assessment Checklist and Go/No-Go Conditions
- Complete DIY Materials List with 2026 Carolina Prices
- Step-by-Step DIY Installation Sequence
- NC and SC Permit Requirements
- The Hybrid Approach — What to DIY and What to Hire Out
- Frequently Asked Questions
The Honest DIY Line — What You Can and Cannot Do Yourself
Not all crawl space encapsulation components require the same skill level. Here is an honest breakdown of each component and what the DIY reality actually is:
| Component | DIY Status | Why / Caveat |
|---|---|---|
| Crawl space cleanup and debris removal | ✓ DIY | Physical labor only. Wear full PPE. Contractors charge $300–$800 for this prep — significant saving. |
| Old vapor barrier removal | ✓ DIY | Remove and bag all old liner. Physical work, no technical skill needed. Wear N95 respirator. |
| Floor vapor barrier installation | ✓ DIY | Most accessible DIY task. Lay, overlap 12 inches, tape seams with rated tape, wrap piers. 6–10 hours for 1,000 sq ft. Saves $800–$1,900 vs professional. |
| Foundation vent sealing | ⚠ DIY WITH CONDITION | Only if NO fuel-burning appliances in crawl space. If gas furnace, water heater, or boiler is present — professional combustion air assessment required first. Also requires NC permit. |
| Rim joist insulation | ✓ DIY | Cut rigid foam to fit joist bays, seal edges with one-component foam. Physical work requiring careful measurement. Saves $300–$600 vs professional. |
| Foundation wall liner (wall encapsulation) | ~ TECHNICALLY DIY | More difficult than floor liner — requires masonry fasteners/adhesive, proper termination, and maintaining 3-inch termite gap. DIY mistakes here are costly to redo. Recommend professional unless highly capable. |
| Wall rigid foam insulation | ~ TECHNICALLY DIY | Cut and fit rigid foam on foundation walls. Manageable but labour intensive. Requires correct termite gaps. For experienced DIYers only. |
| Commercial dehumidifier installation | ✕ PROFESSIONAL | Requires dedicated electrical circuit (110V or 220V depending on model), correct sizing for your specific crawl space, and proper drainage plumbing. Electrical work requires licensed electrician in NC. |
| Mold remediation | ✕ PROFESSIONAL | Must be done before any encapsulation. Any mold area over 10 sq ft requires professional remediation. Never enclose a crawl space with active mold inside. |
| Sump pump and drainage installation | ✕ PROFESSIONAL | Requires proper drainage channel installation, electrical for pump, and waterproofing expertise. Incorrect installation creates flooding risk. Non-DIY. |
Safety First — The Combustion Air Warning and Other Non-Negotiables
⚠️ Critical Safety Warning — Fuel-Burning Appliances
If your crawl space contains a gas furnace, gas water heater, oil-fired boiler, or any other fuel-burning appliance — do NOT seal your foundation vents without a professional combustion air assessment first.
Fuel-burning appliances need oxygen to burn cleanly. In a vented crawl space, foundation vents supply that combustion air. When you seal those vents, you remove the combustion air supply. The appliance continues burning but draws oxygen from the sealed space, eventually producing carbon monoxide instead of burning cleanly. Carbon monoxide is odourless, colourless, and lethal.
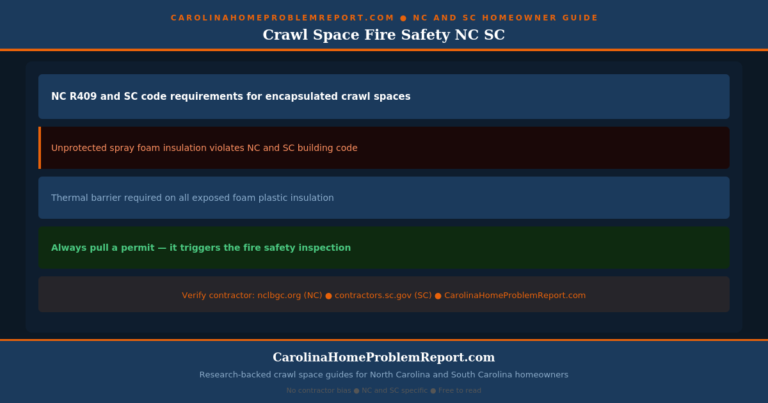
NC Building Code Section R409 addresses this specifically — it requires that fuel-burning appliances in a closed crawl space obtain combustion air from outdoors via dedicated ducting. This is professional work. Do not attempt to seal vents in a crawl space with fuel-burning appliances until a licensed contractor has confirmed or installed a proper combustion air supply.
Additional safety requirements for any DIY crawl space work:
- Minimum PPE required every time you enter the crawl space: N95 respirator (P100 preferred if mold is suspected), safety glasses or goggles, disposable Tyvek crawl suit, waterproof gloves, and knee pads
- Never enter alone: Have someone aware of your location in the crawl space and check in at regular intervals
- Check for radon before encapsulating: Sealing a crawl space in a high-radon area without a radon mitigation system can concentrate radon to dangerous levels. The EPA recommends testing before sealing any below-grade space.
- Do not work over standing water: If water is present, do not enter until the source is identified and the water is removed
- Electrical awareness: Know where your crawl space electrical runs. Do not use metal tools near electrical lines and confirm power is off to any circuits you will work near
Before You Start — Assessment Checklist and Go/No-Go Conditions
Before purchasing any materials or starting any work, conduct a thorough inspection of your crawl space. Certain conditions must be resolved before encapsulation begins — attempting to enclose a crawl space with any of these unresolved creates significantly worse problems than the original moisture issue.
✅ GO conditions — proceed with DIY encapsulation:
- No visible mold on wood surfaces (or mold area confirmed under 10 sq ft and recently treated)
- No standing water or active water intrusion
- No fuel-burning appliances in the crawl space (or combustion air already addressed)
- No termite activity (confirmed by recent inspection)
- Wood moisture content below 19% (test with a wood moisture meter in multiple locations)
- No significant structural damage to floor joists or sill plates
- Crawl space access is adequate — minimum 18 inches x 24 inches opening
- You have confirmed permit requirements with your local building department
✕ NO-GO conditions — hire professionals first:
- Active mold covering more than 10 square feet of wood surface area
- Standing water or evidence of recent flooding
- Gas furnace, water heater, or other fuel-burning appliances without dedicated combustion air supply
- Evidence of active termite activity — mud tubes, soft joists, live insects
- Soft, spongy, or structurally compromised floor joists
- Groundwater seeping through foundation walls or floor (requires drainage system before encapsulation)
- Radon test results above 4 pCi/L (requires mitigation system before sealing)
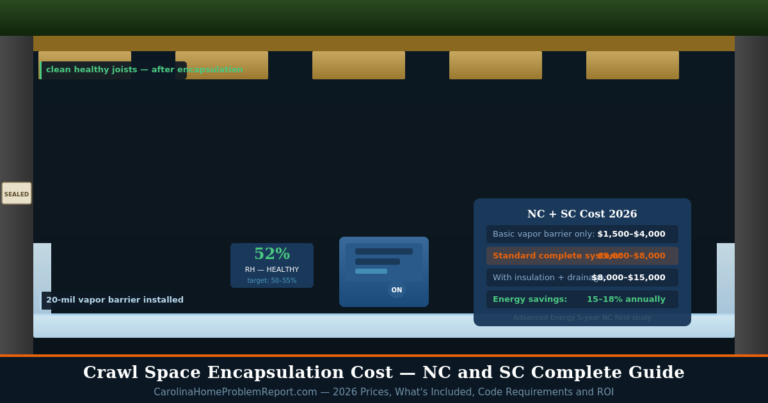
Complete DIY Materials List with 2026 Carolina Prices
This list covers the DIY-accessible components of a complete encapsulation for a typical 1,000–1,500 sq ft Carolina crawl space. Prices are 2026 Carolina market estimates.
| Material | Specification | Estimated Cost |
|---|---|---|
| Vapor barrier liner | 12-mil to 20-mil reinforced polyethylene — enough to cover floor plus 6–12 inches up walls plus 20% overlap allowance | $200–$600 |
| Seam tape | Foil-backed or butyl tape rated for crawl space use — minimum 4 rolls. NOT duct tape or standard household tape. | $60–$120 |
| Landscape pins / ground staples | Heavy-gauge wire pins to hold barrier edges to soil at perimeter — 50–100 pins | $20–$40 |
| Masonry fasteners (for wall liner) | Tapcon screws or powder-actuated fasteners plus termination bar to secure liner to foundation wall | $40–$80 |
| XPS rigid foam board (vent inserts + rim joist) | 2-inch XPS — 4–6 sheets (4 ft x 8 ft) for vent inserts and rim joist insulation | $80–$150 |
| One-component expanding foam sealant | For sealing foam board edges, penetrations, and gaps — 4–6 cans minimum | $40–$80 |
| Construction adhesive (for wall foam) | Foam board construction adhesive for adhering rigid foam to foundation walls | $30–$60 |
| PPE kit | P100 half-face respirator, disposable Tyvek suits (3–4), nitrile gloves, safety glasses, knee pads | $80–$150 |
| Digital hygrometer | WiFi-enabled preferred for remote monitoring — leave in crawl space permanently after installation | $25–$60 |
| Wood moisture meter | For pre-installation check that joists are below 19% moisture content before sealing | $20–$50 |
| Permit fee (NC) | Required for vented-to-closed conversion in NC — contact your local building department for exact amount | $100–$300 |
💡 Total DIY materials cost estimate for a 1,000–1,500 sq ft Carolina crawl space
Floor vapor barrier only (no wall liner, no vent sealing): $200–$600 — a meaningful first step at minimal cost. Complete DIY-accessible components (floor, rim joist, vent sealing, PPE, tools): $700–$1,400. Add professional dehumidifier installation: $1,000–$2,500 additional. Total hybrid DIY + professional dehumidifier: $1,700–$3,900 versus $5,000–$8,000 for fully professional — a genuine saving of $2,000–$5,000.
Step-by-Step DIY Installation Sequence
Follow this sequence exactly. Steps done out of order produce problems — particularly the pre-installation checks in Steps 1 and 2. According to Advanced Energy's closed crawl space research, the most common failure points in DIY encapsulation are installing over unresolved moisture sources and inadequate seam sealing — both addressed in the sequence below.
Pre-Step: Run through the complete Go/No-Go checklist
Check every No-Go condition listed in the assessment section above before touching any materials. This inspection must happen before any work. Install a hygrometer and take baseline humidity readings. Use a wood moisture meter on floor joists in multiple locations — readings must be below 19% before you seal anything. If readings are above 19%, the wood is too wet to enclose safely and an active moisture source must be found and addressed first.
Fix exterior drainage
Clean gutters and extend downspouts at least 6 feet from the foundation. Check that the grade slopes away from the foundation walls — 6 inches of drop over the first 10 feet is the standard. This step happens outside and costs nothing if you do it yourself. Encapsulation installed before fixing drainage may fail if water finds a way in around the barrier.
Clear and prep the crawl space
Remove all debris, old insulation, old vapor barrier, stored items, and any material that could puncture the new barrier from below. Remove and bag old vapor barrier — never install over a failing old liner. Grade the soil surface as level as possible, filling in low spots. Clean the foundation walls of loose mortar, dirt, and any old adhesive where the new liner will attach.
Insulate the rim joists
Do the rim joist before the floor barrier so you are not crawling on your new liner. Cut 2-inch XPS rigid foam to fit each joist bay at the rim joist location. Press firmly against the rim joist and seal all four edges with one-component expanding foam. Work around the entire perimeter — every single bay. This is high-return work: rim joist insulation addresses cold floors above, reduces humidity infiltration, and air seals one of the biggest bypasses in the floor assembly.
Install the floor vapor barrier — starting from the far end
Start from the point furthest from the access and work toward the exit — you complete each section before kneeling on it. Roll the liner across the entire floor extending 6–12 inches up each foundation wall. At each pier, cut a slit to pass the liner through and then wrap the pier separately with a separate piece, overlapping the floor liner by at least 12 inches and taping the joint. Overlap all seams by at least 12 inches. Keep the liner smooth and flat — large wrinkles that create low spots can trap water.
Tape every seam — the most important 30 minutes of the entire project
Run a continuous strip of crawl space-rated seam tape along every overlap. Press firmly and ensure full adhesion across the entire length. Tape every pier wrap junction. Tape the junction where the floor liner meets the wall liner. Do not skip any seam regardless of how snug the overlap feels — unsealed overlaps allow ground moisture to rise through the joint and defeat the entire installation. Use foil tape, butyl tape, or polypropylene tape rated for crawl space moisture — not standard duct tape or household tape.
Attach the wall liner — maintaining the 3-inch termite inspection gap
Using masonry fasteners (Tapcon screws into concrete with a termination bar, or powder-actuated fasteners) attach the wall liner at the appropriate height — 3 inches below the top of the foundation wall, not up to or above the sill plate. This 3-inch gap is required by NC and SC code and must be visible and unobstructed for annual termite inspections. Seal the top edge of the liner to the foundation wall with butyl tape to prevent air bypass.
Seal the foundation vents (only if no fuel-burning appliances and permit obtained)
Measure each vent opening and cut 2-inch XPS rigid foam inserts to fit. Press firmly into each vent frame. Run a bead of one-component spray foam around all four edges. Allow to cure and trim any excess. Also seal the access door frame and any pipe or wire penetrations through the foundation walls. Every unsealed penetration is an air and moisture infiltration pathway that undermines the sealed system you are creating.
Final inspection and monitoring setup
Before leaving, conduct a complete visual inspection — 100% soil coverage, all seams taped, all piers wrapped, all vents sealed, 3-inch gap maintained at wall liner top. Install the hygrometer in a central location. Check readings again after 7 days and again after 30 days to confirm the moisture improvement. Schedule professional dehumidifier installation if not already completed — a sealed crawl space without a dehumidifier will see humidity rise, not fall, in a Carolina summer.
NC and SC Permit Requirements
🏭 North Carolina
- Permit required for converting a vented crawl space to a closed crawl space under NC Section R409
- Simple vapor barrier installation on the floor only (without vent sealing) is often permit-exempt — confirm with your local building department
- Permit cost: typically $100–$300 depending on county
- Work must be inspected by the local building inspector before insulation covers anything
- Unpermitted work creates liability at resale — buyers and inspectors flag it during due diligence
🏭 South Carolina
- Similar permit requirements to NC for vent sealing and closed crawl space conversions
- Requirements vary more by county/municipality than in NC — always confirm locally
- Coastal SC in FEMA flood zones: additional review required — flood vent provisions may limit vent sealing options
The Hybrid Approach — What to DIY and What to Hire Out
For most Carolina homeowners the optimal approach is a hybrid — doing the labour-intensive but technically straightforward work yourself, and hiring professionals for the electrical work and for situations that require professional judgment. According to NC State Extension's Healthy Homes programme, a well-installed encapsulation system regardless of who installs it delivers the same performance benefits — the key is getting the installation correct.
✓ DIY — Saves $2,000–$4,000:
- Crawl space cleanup and debris removal
- Old liner and insulation removal
- Floor vapor barrier installation
- Pier wrapping and seam taping
- Rim joist insulation with rigid foam
- Foundation vent sealing (if no fuel-burning appliances and permit obtained)
- Penetration sealing with spray foam
- Hygrometer installation and monitoring
✕ Hire Professional For:
- Any mold remediation before starting
- Combustion air assessment if fuel-burning appliances present
- Commercial dehumidifier sizing and installation (requires licensed electrician for circuit)
- Drainage system and sump pump if groundwater present
- Structural repairs to compromised joists
- Permit procurement if unfamiliar with the process
- Post-installation inspection to confirm code compliance

Frequently Asked Questions
Can I do crawl space encapsulation myself in NC?
Yes — the vapor barrier installation, rim joist insulation, and vent sealing components are within reach of a capable DIY homeowner. Budget 2–3 full days for a 1,000–1,500 sq ft crawl space. The work is physically demanding but not technically complex. The dehumidifier installation requires a licensed electrician for the dedicated circuit — this is the component most homeowners hire out even in a hybrid DIY approach. Confirm permit requirements with your local building department before starting any vent sealing.
How much can I save by doing crawl space encapsulation myself in NC or SC?
Realistic savings in the NC and SC market are $2,000–$5,000 depending on your crawl space size and the scope you complete yourself. Materials for a complete DIY-accessible encapsulation run $700–$1,400. Professional completion of the same scope costs $3,000–$5,500 in labour. Add $1,000–$2,500 for professional dehumidifier installation either way. Total hybrid approach: $1,700–$3,900 versus $5,000–$8,000 fully professional.
What thickness vapor barrier do I need for DIY encapsulation in Carolina?
12-mil minimum for any installation intended to last more than a few years. 20-mil is the professional standard and is what Carolina contractors now install for encapsulation work. The code minimum is 6-mil — but 6-mil tears on the first service visit and needs replacing within 5–7 years. The material cost difference between 6-mil and 20-mil across a 1,200 sq ft crawl space is $300–$400 — worth every dollar for the durability difference.
Can I seal my crawl space vents myself without hiring anyone?
The physical act of sealing vents with rigid foam and spray foam is DIY work — but with two important conditions. First, there must be no fuel-burning appliances in the crawl space. If there is a gas furnace, water heater, or boiler present, get a combustion air assessment from a licensed contractor before sealing any vents. Second, vent sealing as part of a vented-to-closed conversion requires a permit in NC. Do not seal vents without first checking permit requirements with your local building department.
How long does DIY crawl space encapsulation take?
For a 1,000–1,500 sq ft crawl space in reasonable starting condition, budget 2 full days for the floor vapor barrier, rim joist insulation, and vent sealing. Add a half day for crawl space cleanup if the space has significant debris or old insulation to remove first. Work in sessions of 2–3 hours maximum — crawl space work is physically demanding and mistakes increase when you are fatigued. Take breaks, stay hydrated, and wear PPE the entire time you are inside.
DIY crawl space encapsulation in Carolina is a realistic money-saving option for capable homeowners — but only when approached with complete honesty about what you can and cannot safely do yourself. The vapor barrier, rim joist insulation, and vent sealing components are genuine DIY work that save real money. The dehumidifier installation requires a licensed electrician. Any mold, structural damage, combustion air issues, or drainage problems require professional assessment and resolution before any DIY work begins.
If you are uncertain whether your crawl space has conditions that require professional attention before DIY work, a professional assessment — typically free or low-cost from crawl space contractors in the competitive NC market — is worth the time before spending money on materials. North Carolina has over 250 active specialty crawl space contractors, more than any other state. Getting 2–3 quotes is easy and gives you both professional pricing to compare against DIY costs and an expert opinion on whether any professional work is needed first.
Get Free Quotes from Carolina Crawl Space Contractors →The Carolina Home Problem Report editorial team researches and writes guides for homeowners across North and South Carolina. Our research draws on Advanced Energy field studies, NC State Extension Healthy Homes publications, NC Building Code research, CrawlSpaceCosts.com market data, and insights from licensed Carolina contractors. We are not contractors — we are a research team dedicated to giving Carolina homeowners clear, locally specific, unbiased answers.
Carolina Home Problem Report is an informational resource for homeowners. We are not licensed contractors. Always consult a qualified professional before making home repair decisions. See our Disclaimer and Affiliate Disclosure.=]\