Crawl Space Wood Rot [Warning Signs, 3 Types, Screwdriver Test + Complete Repair Cost Guide for Carolina]
Crawl space wood rot is fungal decay of floor joists, sill plates, and subfloor caused by sustained moisture above 19% wood moisture content. In Carolina crawl spaces, wood rot is not a rare problem — it is the predictable outcome of years of uncontrolled humidity. The good news is that early-stage rot can be treated with borate preservatives. Advanced rot requires structural sistering or replacement. The permanent fix is always the same: eliminate the moisture that caused the rot before any repair work is done.
⭐ Key Takeaways
- ✓Wood rot in crawl spaces is caused by fungi — not by water itself. Sustained moisture above 19% wood content creates the conditions fungi need to establish and consume the cellulose in structural wood.
- ✓There are three types of wood rot in Carolina crawl spaces: wet rot, dry rot, and brown rot — each looks different and responds differently to treatment
- ✓The screwdriver test is the fastest way to assess wood rot severity — any joist that penetrates easily under light pressure is structurally compromised and needs professional assessment
- ✓Joist sistering costs $100–$300 per joist. Beam replacement costs $1,500–$5,000 per beam. Never repair before eliminating the moisture source.
- ✓Crawl space wood rot is a structural issue that progresses silently — floors feel soft, then bounce, then collapse. In Carolina's climate, a crawl space with chronic moisture above 70% RH can develop significant wood rot within 2–5 years.
Crawl space wood rot is the structural consequence of crawl space moisture that went uncorrected for too long. It is the stage beyond mold — the point where the fungi that colonised the floor joists in response to sustained humidity have been consuming the cellulose in the wood for long enough that the wood itself has been structurally weakened. It is what a home inspector is describing when they report "soft joists," "compromised subfloor framing," or "evidence of fungal decay" in the crawl space section of their report.
According to Advanced Energy's field research on North Carolina homes, 70–90% of older Southeast homes already have moisture-damaged insulation or mold when first professionally inspected. Wood rot — the structural progression of that moisture damage — is found in a significant percentage of those same homes. The conditions that produce it are endemic to older vented Carolina crawl spaces: persistent humidity above 70% RH for extended periods, wood in direct or near contact with wet soil, and no active moisture removal system.
This guide gives Carolina homeowners the complete picture of crawl space wood rot — what causes it, how to identify the three types, how to test for structural compromise with the screwdriver test, what repair options exist and what they cost in the NC and SC market, and the correct sequence that ensures repairs are not wasted on a crawl space that will rot again within a few seasons.
In This Article
- What Causes Wood Rot in Carolina Crawl Spaces
- The Three Types of Wood Rot — Wet, Dry, and Brown Rot
- Warning Signs of Wood Rot Above and Below the Floor
- The Screwdriver Test — How to Assess Structural Compromise
- Repair Options — Borate Treatment, Sistering, and Replacement
- Wood Rot Repair Costs in NC and SC — 2026 Data
- The Correct Repair Sequence — Moisture First, Then Structure
- Frequently Asked Questions
What Causes Wood Rot in Carolina Crawl Spaces
It is important to understand what wood rot actually is before addressing it. Wood rot is not damage caused directly by water. It is fungal deterioration — the result of wood-destroying fungi consuming the cellulose and lignin that give wood its structural strength. Water is required for those fungi to survive and operate, but it is the fungi doing the structural damage, not the water itself. This distinction matters for treatment.
Wood-destroying fungi require four conditions simultaneously: a food source (wood cellulose), moisture (wood moisture content above approximately 19%), oxygen, and temperatures above roughly 40°F. A Carolina crawl space provides all four for most of the year. The critical variable — the only one a homeowner can control — is moisture. When wood moisture content stays consistently below 19%, fungi cannot establish or survive. When it rises above 19% and stays there, fungal colonisation begins and wood rot progresses.
The specific Carolina conditions that accelerate wood rot
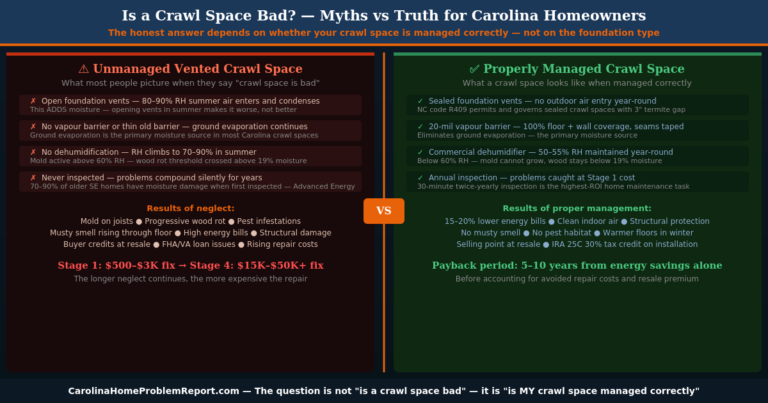
- Vented crawl spaces in summer — outdoor air at 80–90% RH enters through foundation vents, condenses on cooler wood surfaces, and drives wood moisture content above 19% for months at a time
- Direct soil contact — sill plates and beam ends that rest in or near soil absorb ground moisture continuously; these are typically the first locations where wood rot appears
- Fallen or wet insulation — insulation batts that have absorbed moisture and fallen against floor joists hold that moisture in prolonged contact with the wood, creating ideal rot conditions in a specific location
- Plumbing leaks — a slow drip from a supply line, drain pipe, or condensate line that goes unnoticed can produce severe localised rot in a single season
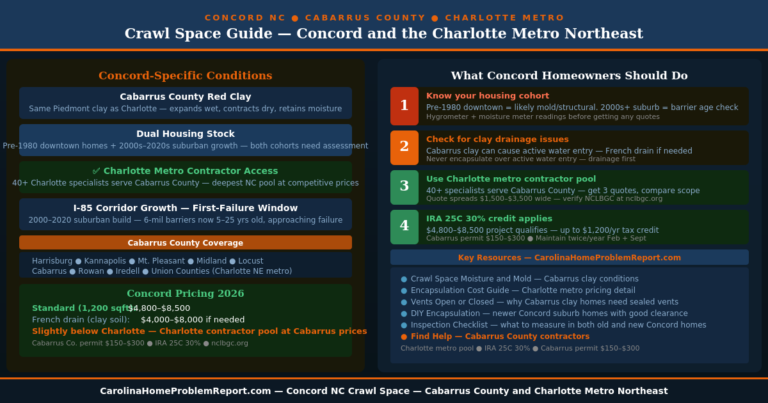
- Clay soil and poor drainage — the heavy clay soils of the Carolina Piedmont hold moisture against foundations for days after rain events, keeping the ground surface wet and soil evaporation rates high
The Three Types of Wood Rot — Wet, Dry, and Brown Rot
Different types of wood rot look different, behave differently, and require slightly different approaches. Knowing which type you are dealing with helps you assess the situation accurately.
Warning Signs of Wood Rot Above and Below the Floor
Wood rot often announces itself through signals in the living space before any visible damage is found in the crawl space. Knowing both sets of signs helps catch it earlier.
SIGNALS INSIDE YOUR HOME — signs above the floor:
- Floors that feel soft, spongy, or springy when walked on — especially near exterior walls and in corners where moisture tends to concentrate
- Floors that have a noticeable bounce or flex that was not there a few years ago
- Tiles that are cracking or lifting without obvious cause near exterior walls
- Doors or windows on the first floor that have started sticking or no longer close properly — this can indicate structural shift from rot-weakened joists
- A persistent earthy or mushroom-like smell — distinct from the standard musty smell of high humidity and more indicative of active fungal growth
- Flooring that is pulling away from walls or baseboards that was previously tight
WHAT TO LOOK FOR IN THE CRAWL SPACE:
- Discoloration on floor joists — brown, black, or orange colouration distinct from the natural wood colour indicates fungal activity
- Fungal growth visible on wood surfaces — white cottony threads (mycelium), mushroom-like fruiting bodies, or powdery spore deposits
- Wood that looks intact but feels soft or gives when pressed with a finger — brown rot in particular can look solid while being significantly weakened
- Cube-like cracking pattern on joists — the characteristic signature of brown rot or dry rot with significant cellulose loss
- Sill plate or beam ends that appear shrunken, crumbling, or darker than adjacent sections — these contact-point locations are typically first affected
- Insulation that has fallen from between joists and lies on the ground — often indicates the joist faces above were wet long enough to fail their grip on the insulation
The Screwdriver Test — How to Assess Structural Compromise
The screwdriver test is the standard field assessment used by crawl space professionals to determine whether a wood member has been structurally compromised by rot. It takes about 30 seconds per joist and gives you a reliable indication of severity before any professional assessment.
The tap test — listen first
Tap the joist firmly with the handle of your screwdriver. Healthy wood produces a sharp, dense knock. Rotted wood produces a dull, hollow thud. Move along the length of the joist — a section that sounds hollow when the rest sounds solid indicates localised rot. This tells you where to focus the screwdriver test.
The penetration test — assess strength
Press the tip of a flathead or Phillips screwdriver firmly against the wood surface and push. Use moderate hand pressure — not a hard thrust. Healthy structural wood resists the tip and does not penetrate. Wood that the screwdriver penetrates under moderate pressure is structurally compromised. The depth of penetration indicates severity — surface give (less than 1/4 inch) is early stage; penetration of 1/2 inch or more under light pressure indicates significant structural loss.
Test all surfaces — top, bottom, and sides
Test the bottom face of the joist (most accessible), both side faces, and if reachable the top face. Rot often progresses from the outside surface toward the core — a joist that appears sound on its bottom face may already have significant decay on the top face or sides where it contacts insulation or has had sustained moisture contact.
Pay special attention to these locations
Sill plates (where framing meets the foundation wall), rim joists (where floor framing meets the foundation perimeter), beam ends at pier contacts, and any location directly below a bathroom or kitchen plumbing run. These are the highest-probability rot locations in a Carolina crawl space.
When to stop and call a professional immediately
If multiple joists fail the screwdriver test, if any main beam or girder shows penetration, or if the sill plate crumbles when probed, do not walk on the floors above these areas until a structural assessment is completed by a licensed contractor or structural engineer. Seriously compromised floor framing can fail under normal foot traffic load without warning.
Repair Options — Borate Treatment, Sistering, and Replacement
The repair approach depends on the severity of the rot and the structural role of the affected member. These three options exist on a spectrum from preventative to major structural work:
Wood Rot Repair Costs in NC and SC — 2026 Data
| Repair Type | Cost Range | Notes |
|---|---|---|
| Borate treatment (crawl space) | $500–$2,000 | Preventative/early-stage only. Does not restore structural strength. |
| Joist sistering (per joist) | $100–$300 | Most common structural repair. Typical project: 10–20 joists. $1,000–$6,000 total. |
| Support beam replacement (per beam) | $1,500–$5,000 | Requires temporary house jacks and structural expertise. |
| Sill plate replacement (perimeter) | $5,000–$15,000 | Significant work — involves lifting and re-setting exterior framing connections. |
| Wet insulation removal | $500–$2,000 | Must be removed before structural assessment and before encapsulation. |
| Full repair + encapsulation package | $7,500–$20,000+ | When significant structural repair precedes complete encapsulation. Most comprehensive solution for advanced rot cases. |
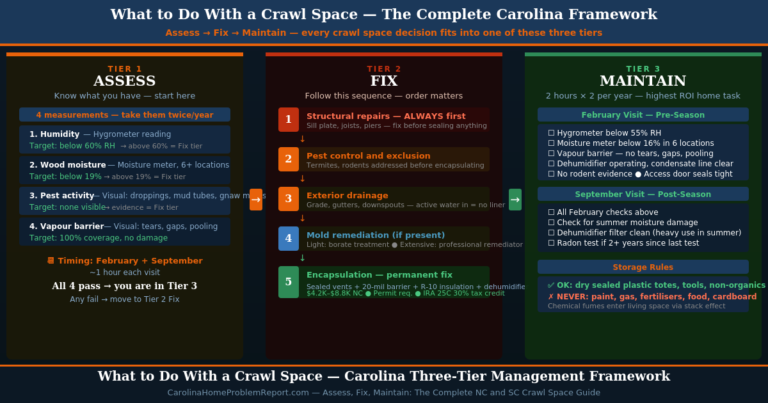
The Correct Repair Sequence — Moisture First, Then Structure
This sequence is absolute. Repairing rotted wood without first fixing the moisture source that caused the rot produces new rot within a few seasons. The repairs become maintenance rather than a solution, and the cumulative cost exceeds what permanent moisture control would have cost at the start.
Fix all exterior drainage and moisture sources first. This means gutters, downspouts, grading, foundation crack repairs, and any plumbing leaks. Nothing else happens until the water sources are corrected.
Remove wet insulation. Any insulation that has absorbed moisture must be removed before structural assessment — it conceals the wood beneath and holds moisture against it. Bag and remove all wet or fallen insulation.
Conduct professional structural assessment. A licensed contractor or structural engineer assesses the full extent of rot using the screwdriver test and moisture meters. They map all compromised members and determine whether sistering, replacement, or borate treatment is appropriate for each affected area.
Allow the crawl space to dry to below 19% wood moisture content. Use temporary dehumidification if needed. Confirm dryness with a wood moisture meter before structural work begins — sistering or replacing wet wood traps moisture and can produce new rot at the connection points.
Complete structural repairs. Sister or replace compromised joists and beams as assessed. Apply borate treatment to all adjacent wood. This work must precede encapsulation — encapsulating a space with structurally compromised wood before repairs locks in the damage.
Install permanent moisture control system. Vapor barrier, sealed vents, and commercial dehumidifier — the complete encapsulation system that maintains below 19% wood moisture content permanently. According to NC State Extension's Healthy Homes program, this final step is what converts wood rot repair from a recurring expense into a permanent structural solution.

Frequently Asked Questions
How do I know if I have wood rot in my crawl space?
Look for soft or springy floors, a musty or earthy smell, discoloured wood in the crawl space, and wood that shows cube-like cracking or fungal growth. The screwdriver test gives you a definitive assessment — press the tip firmly against floor joists. Wood that penetrates easily is structurally compromised and needs professional assessment. If you have had chronic moisture in the crawl space for more than 2 seasons without active moisture control, a professional inspection is warranted even without obvious symptoms above the floor.
Can I repair crawl space wood rot myself?
Early-stage surface treatment with borate preservatives can be DIY work if the crawl space is accessible and the rot is genuinely early stage (no screwdriver penetration). Any structural work — sistering, beam replacement, or sill plate work — requires professional expertise and should not be DIY. The reason is not just the skill required but the safety risk: structurally compromised floor framing supporting a loaded floor above is a collapse hazard during repair work, and temporary house jacking requires professional knowledge of load paths.
How much does crawl space wood rot repair cost in NC or SC?
Joist sistering — the most common structural repair — costs $100–$300 per joist in the NC/SC market. A typical project involving 10–20 compromised joists runs $1,000–$6,000 for the structural work. Add borate treatment ($500–$2,000), wet insulation removal ($500–$2,000), and a complete encapsulation system ($3,000–$8,000) and total project costs for comprehensive treatment of a wood rot problem typically run $5,000–$15,000.
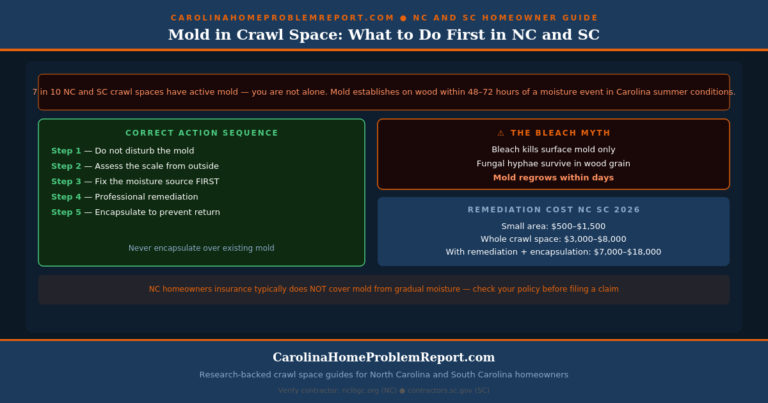
What is the difference between wood rot and mold in a crawl space?
Mold grows on the surface of wood — it discolours and can stain the surface but does not consume the wood structure. Mold at the surface is a health concern but not a direct structural one. Wood rot fungi actually consume the cellulose and lignin inside the wood, breaking down its structural fibres. A joist covered in black mold may still be structurally sound. A joist with brown rot may look superficially fine but have lost 50% of its structural strength. This is why the screwdriver test matters — you cannot assess structural integrity by visual inspection alone.
Will wood rot keep getting worse if I fix the moisture?
Wet rot and brown rot fungi cannot survive without sustained moisture — once the wood dries to below 19% moisture content and stays there, active rot fungi die and progression stops. The structural damage that already occurred does not reverse, but it does not worsen either once the moisture is eliminated. Dry rot is the exception — Serpula lacrymans can transport its own moisture through mycelium threads and may continue spreading even after the primary moisture source is removed. This is why dry rot requires a larger removal zone and professional assessment regardless of moisture status.
Crawl space wood rot in Carolina homes is not an accident — it is the predictable structural consequence of crawl space moisture that was not actively managed. The region's climate creates the conditions fungi need for a significant portion of every year. Homes with vented crawl spaces and no moisture control system are running an ongoing experiment in how long Carolina framing wood can resist fungal decay — and the answer, based on field data, is usually 5–15 years before structural repairs become necessary.
If your crawl space has soft floors, a musty smell, or any history of moisture problems, schedule a professional inspection before the structural damage progresses to the beam and sill plate level where costs increase dramatically. The screwdriver test gives you a useful preliminary assessment — but only a professional with moisture meters and structural knowledge can give you the complete picture of what repairs are needed and in what order.
Find a Crawl Space Professional Near You →The Carolina Home Problem Report editorial team researches and writes guides for homeowners across North and South Carolina. Our research draws on Advanced Energy field studies, NC State Extension Healthy Homes publications, Angi and HomeAdvisor repair cost data, and insights from licensed Carolina contractors and structural professionals. We are not contractors — we are a research team dedicated to giving Carolina homeowners clear, locally specific, unbiased answers.
Carolina Home Problem Report is an informational resource for homeowners. We are not licensed contractors or structural engineers. Always consult a qualified professional before making structural repair decisions. See our Disclaimer.